![]()
How clean is clean enough? Insufficient cleaning before heat treating can interfere with results; insufficient cleaning after heat treating can impact perception of the part. Discover four methods of measuring part cleanliness that can take place within your heat treat operations in this article provided by SAFECHEM Europe GmbH.
This Technical Tuesday article is drawn from Heat Treat Today's March Aerospace Heat Treating print edition. If you have any information of your own about cleaning after heat treating, our editors would be interested in sharing it online at www.heattreattoday.com. Email Bethany Leone at bethany@heattreattoday.com with your own ideas!
Previously we talked about the importance of cleaning for demanding heat treat applications — in particular gas nitriding, or ferritic nitrocarburizing (FNC), low pressure carburizing (LPC), and brazing. So, if cleaning is a nonnegotiable for certain heat treatment processes, one might ask: how clean is clean enough?

The basic definition of clean is removing unwanted substances, particles, and contaminations. However, when applied to surface cleaning, “clean enough” is determined by what you want to do next in your processing. Parts are generally clean enough if satisfying outcomes can be achieved in the subsequent application.
First, Do You Know the Expectations?
Unlike measuring hardness, monitoring or determining part cleanliness is by no means a straightforward matter.
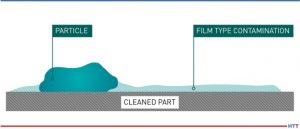
There are two different kinds of contaminations to consider:
- Particle contaminations
- Film-type contaminations

Source: SAFECHEM Europe GmbH
Whereas there are industry definitions or standards for particle contaminations (e.g., VDA-19 or ISO-16232 for the automotive industry), standards for film-type contaminations are not yet fully established.
This inadequacy also explains why many companies do not fully know what to expect when it comes to cleanliness, and they do not fully grasp the potential impact that insufficient cleaning could cause.
Especially when it comes to the heat treat industry, it is important to differentiate between the component cleanliness requirements before and after heat treatment.
Film-type contaminations are the primary factor which could negatively impact heat treat results. Requirements on particle contaminations (VDA-19) usually come from the automotive industry and need to be ensured/monitored after heat treatment.
Therefore, a distinction must be made between a) surface requirements for heat treatment and b) client cleanliness requirements on the final components.
What Is the Right Measurement Method?
The analysis of film-type contaminations and particle contaminations are two different subject matters. Measurement methods for one cannot replace the measurement methods for the other. Often, it is quite common for companies to have requirements on both film-type contaminations (e.g., surface energy in dyne/cm or mN/m) and particle contaminations (e.g., max. particle load) in their component drawings.
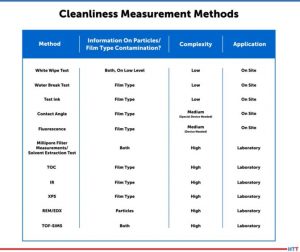
Some common measurement methods for determining contaminations include:
- White wipe test: A simple visual inspection test using a clean and dry white wipe to wipe across the surface for the detection of colored residues. Because contaminations can negatively impact heat treat results, inspection should take place prior to heat treatment. The test is limited to colored particles whose size can be perceived by the eye.
- Water break free test: An easy test to check if oil droplets might be present on the surface is when parts are rinsed with clean water at an angle. If there are contaminations, water will separate around those areas, showing a “break” in the water surface.
- Dyne testing: This method is commonly used for measurements of film-type contaminations. Dyne inks and fluids are applied to a substrate for measurement of its surface energy. The surface energy (measured in dyne/cm or mN/m) can be identified as the highest dyne solution that wetted out the substrate surface. The higher the dyne level, the better the adhesion of the surface for painting, coating, or bonding. However, the test does not provide information on the types of contaminations present.
- Millipore filter measurements/solvent extraction test: This measures surface contamination on parts as a weight per 0.1 m2. Samples are obtained by flushing the cleaned part with an organic solvent where particulates are collected on a filter disc (solvent will be evaporated off later). The test can determine the nature, number, sizes of particles, and if there are reflecting/ non-reflecting metallic particles. Moreover, oil film on parts can be measured after evaporation of the extraction solvent. For automotive, aerospace, or electrical, the level of cleanliness typically ranges between 0.01–0.001g per cm2.
In general, these methods differ in their complexity and informative value, and also if they can be carried out on site or off site (e.g., in a laboratory). The table below provides an overview of common measurement methods:

Source: SAFECHEM Europe GmbH
Determining Cleanliness — An Art and a Science in Itself
As you now see, the variances and potential limitations of different measurement methods can add to the complexity of cleaning validation. Consider the following:
- Should you measure a specific surface area, or the entire part? And how do you measure pre-assembled components with different parts molded together?
- It might be easy enough to measure surface cleanliness, but what about blind holes and crevices?
Visual inspections have many shortcomings. It is subjective, time consuming, and does not cover total level of contamination. The quality of inspection will very much depend on the operator. While automated particle counting is efficient and objective, it does not offer insights on specific contaminants.
Extraction methods targeting nonvolatile residues (NVR) can help determine a total level of contamination, but not spot contamination. It does not account for inextricable contaminants either, which could impact part functionality.
Meaningful Measurement Begins with Understanding the Big Picture
This is why, in order to measure and monitor cleanliness in a meaningful and reliable way, you should consider:
- What potential contaminations could come about in your process/facilities?
- What contaminants are you looking to remove?
- What are the next processing steps?
- What are the risks involved in removing the contaminants?
- What are the risks associated with the potential residue?
Since every test has its own limitations, you should be mindful of the test specifications, too — for example, how it is conducted, result variability and reproducibility, as well as biases.
Cleaning can be a crucial step in heat treat, but more cleaning does not always equal better. More cleaning also implies more costs, more time, more resource usage. What’s really key is understanding what you, or your clients, are trying to achieve.
As you see, cleaning and measurement require expertise and knowhow — context is everything. Reach out to a cleaning specialist or trusted cleaning solutions expert for advice. If insufficient component cleanliness seems to be affecting your heat treat results, our cleaning specialists, along with our partners, would be happy to advise.
For more information:
Contact SAFECHEM Europe GmbH at service@safechem.com or visit www.safechem.com
 Find heat treating products and services when you search on Heat Treat Buyers Guide.com


