This article originally appeared in Heat Treat Today’s March 2019 Aerospace print edition.
How a Custom Designed Fixture and Hardness Testing Unit Solved a Major Aerospace Engine Manufacturer’s Hardness Testing Dilemma
Situation: A major aerospace engine manufacturer wanted to ensure the appropriate hardness of a specific section of a heat-treated engine housing. They wanted to non-destructive test the actual housing and not test shims. They wanted to do the test in-house so as to not stall production by having to ship the part out for testing. Another reason they did not want to ship the parts out for testing was the size of the parts. Some of the parts had a diameter as large as 40 inches (102 cm), 20 inches (51 cm) high, and 900 lbs (400 kg). The aerospace company also wanted an automated, full-proof system that reduced the chance of human error.

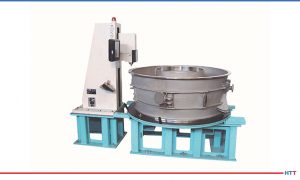
Solution: The solution came in the form of a custom-built hardness testing machine and an innovative fixture to hold the engine housing. As can be seen in Figure 1, AFFRI USA, located in Illinois, designed a fixture to hold both a custom-designed hardness testing machine as well as a fixture to hold the engine housing.
The Hardness Testing Machine
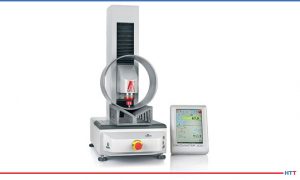
The specific hardness testing unit chosen for the job was DAKOMASTER 300. Typically, this unit is a tabletop unit as shown in Figure 2. For this specific aerospace application, the unit was modified so that it could be securely attached to the steel

construction holding fixture. Additionally, the custom-built unit was adapted so that the measuring head had a much greater vertical and horizontal range to accommodate varying height engine housings. The engine housings varied in size from as large as 110 inches (2.8m) in diameter and 39 inches (1m) high to the smallest being approximately 16 inches (400mm) in diameter and 9 inches (250mm) tall. The typical vertical working distance range on the tabletop unit is approximately 12 inches (300mm) while the custom unit has a vertical working distance range of 39 inches (100cm). The measuring and loading head of the unit was designed so that no misalignment would occur with the engine housing. If effective, the machine utilized what can be considered a self-clamping technology that structural deflection is absorbed ensuring an accurate and absolute reading in varying test conditions. Finally, to eliminate potential operator error, once in place, the test is initiated by a single button eliminating the need for operator engagement.
The Fixture Table
Since part and machine stability is critical for accurate hardness tests, providing a stable base for the large aerospace parts was a critical part of the solution. The company wished to execute multiple tests in multiple locations around the flange face of the engine housing. Some tests were to be conducted on the outer edge of the housing and some tests were to be conducted on the inner edge of the housing. To do this, the fixture holding the engine housing was designed so that the entire housing could move closer to or further away from the test machine. Additionally, the housing had to be rotated so that the machine could test completely around the perimeter of the housing flange face. To accomplish this, the part fixture was equipped with heavy-duty bearings so that the entire engine housing was able to be easily rotated. Once rotated to the desired location, the table would move closer to or further away from the test machine to pinpoint the exact spot for the test.
The Results
Simply stated, the results were excellent. Hundreds of tests have been run on a wide range of engine housing diameters, all with success – all well within the 1% tolerance. Being able to conduct in-house testing has helped smooth production. Having hardness testing equipment that is flexible enough to handily negotiate large or small engine housings saved the company money from needing to purchase several hardness testing machines and fixtures. Tests can be run quickly and simply by rotating the part fixture table and operator error has been virtually eliminated with the single push-button equipment. The hardness testing equipment provided for this aerospace company is capable of performing HRC, HRB, HRT, HRN measurements all in conformance with ASTM E-18. HTT
About the Author: AFFRI is an Italian-based international designer and manufacturer of state-of-the-art hardness testing systems for over 60 years. The company’s North American headquarters is located in Wood Dale, Illinois. This article originally appeared in Heat Treat Today’s March 2019 Aerospace print edition and is published here with the author’s permission.


