![]()
 There is no way to validate the heat treating process without completely destroying the job. Here’s where pyrometry becomes crucial. The precision, accuracy, and uniformity standards of specifications like AMS2750 and CQI-9 provide peace of mind without destructive testing. Read how the requirements of these regulations are benefiting the industry through standardization and defect prevention.
"El tratamiento térmico como la mayoría de los procesos especiales, tiene la particularidad de ser una operación crítica que para su validación requiere de pruebas destructivas. . . "
Read the English translation of this article by Víctor Zacarías, general director at Global Thermal Solutions Mexico, in the version below, or the Spanish translation when you click the image to the right.
Both Spanish and English translations of the article were originally published in Heat Treat Today's March 2022 Vacuum Furnace print edition.

General Director
Global Thermal Solutions Mexico
Introduction
Heat treatment operations are generally perceived as black boxes whose results are not very predictable. Although we understand the physical mechanisms involved in modifying the properties of a certain material, heat treatment furnaces are thermodynamically imperfect, and sometimes the final results are too.
An extra variable must be added to this picture. As the properties of the final product can only be validated through destructive testing, we must have a high level of process control in place if we want to ensure repeatability in heat treat operations. This is where pyrometry specifications play an important role, particularly in defining the correct temperature controls for consistent heat treatment.
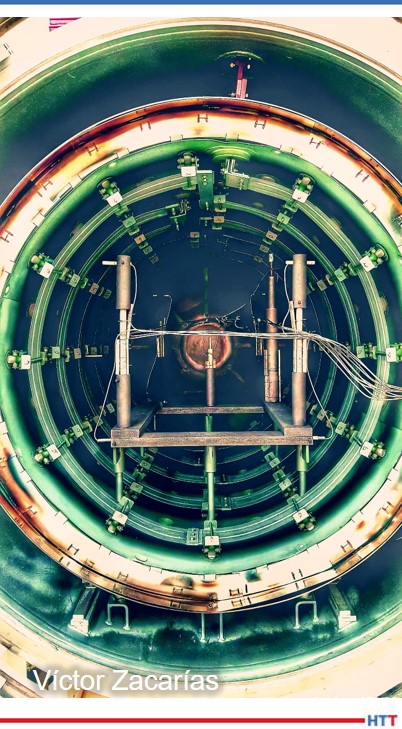
Pyrometry standards/specifications define the temperature control requirements for thermal processing equipment used in heat treatment operations (furnaces, ovens, muffles, etc.). These specifications are very comprehensive documents that allow us to solve the following problems:
- How do you know that the temperature readings are accurate?
- How do you know the temperature variation of your measurement system?
- How do you know that the entire load was exposed to a consistent temperature during the cycle?
- How do you know what you know? (Documented evidence)
The most widely accepted and proven pyrometry specifications in the industry are:
- AMS2750: issued by SAE International, it is the universally accepted standard for thermal processing certification purposes in the aerospace industry (Nadcap).
- AIAG CQI-9: this assessment provides the pyrometry requirements for the evaluation of heat treatment in the automotive industry.
- API 6A & 16A: annexes establish the pyrometric requirements for the components treated in the energy industry (oil and gas).
All of these specifications describe in their content at least the following four items:
- Calibration of thermocouples (or any other temperature sensor), as well as the limit of use depending on its
application - Calibration of control and test instrumentation
- The procedure and acceptance criteria for conducting a System Accuracy Test (SAT)
- The method and acceptance criteria for a Temperature Uniformity Survey (TUS)
These specifications are subject to continuous revisions to ensure that the requirements are understood. However, it does not change the fact that they are very extensive documents, generally misinterpreted and which require experienced personnel for their implementation. As an example of these difficulties, in Nadcap accreditation audits, eight out of 10 findings are directly related to pyrometry. CQI-9 assessments in the automotive industry show similar figures.
Despite the above, the right implementation of the pyrometry requirements has proven for years that a consistent heat treatment process can be achieved, providing data that allows defect prevention in an effective way.
Thermocouple Requirements
A thermocouple is a very simple temperature sensor that consists of two conductors with different thermoelectric characteristics. The conductors are joined at one end (hot junction) which will be in contact with the element whose temperature is to be measured. When the conductors are exposed to a temperature gradient, a difference of electrical potential (mV) is generated due to the phenomenon known as Seebeck effect. At the other end (cold junction), a voltmeter is used to measure the potential generated by the temperature difference between the two ends (See Figure 1).

Pyrometry standards defi ne the calibration requirements for the thermocouples used in thermal processing equipment. In order to acquire thermocouples in accordance with these regulations, we must consider the final use of the sensor to define the maximum error allowed at the time of calibration (See Table 1).
Once we have a calibrated thermocouple, the date of the installation must be documented to track the sensor life. Thermocouples have a finite lifetime because of the natural degradation of the materials of which they are made, leading to a decrease in their accuracy. Therefore, the replacement of temperature sensors must be calendarized depending on the thermocouple type and the temperature to which they are exposed.
Instrumentation Requirements
Instruments receive electrical communication from thermocouples and convert potential (mV ) to a usable format.
Pyrometry specifications like AMS2750 and CQI-9 define the resolution and accuracy requirements for the instrumentation used in heat treating equipment, as well as the frequency at which these instruments must be calibrated. The level of accuracy of the instrumentation is based on the applicable specification and the purpose of the instrument, as shown in Table 1.

It is important to consider the manufacturer’s instructions when installing and calibrating control and recording instruments. From a metrological standpoint, documentation must evidence that the calibrations are traceable to a national reference standard (NIST, CENAM, etc.) and, in most industries, carried out in accordance with ISO/IEC 17025.
The System Accuracy Test
A System Accuracy Test (SAT) or probe check is a very simple test to ensure that the entire measurement system (thermocouple and instrument together) provides an accurate representation of the temperature. It is an on-site comparison of the furnace’s measurement system against an independent calibrated measurement system (See Figure 2). The purpose of this test is to determine if the natural deviation of the temperature measurement system is still acceptable.

The criteria to determine whether the results of an SAT test are acceptable or not will depend on the applicable regulations, AMS2750 or CQI-9. If the difference in the SAT exceeds the limits allowed by the standard, internal procedures must take into account the following considerations before reprocessing parts:
- Document that the equipment has failed a test
- Determine the root cause of the failure
- Implement corrective actions
When an SAT test result fails, corrective actions can generally be reduced to two options: replace the thermocouple and/or recalibrate and adjust the instrument.
A SAT is performed to assure the accuracy of all the systems in the furnace which are used to make decisions about the product, both control and recording. It is important to note that SAT test results change over time, therefore historic SAT data is very useful to identify trends and proactively take action before a deviation shows.
Temperature Uniformity Surveys
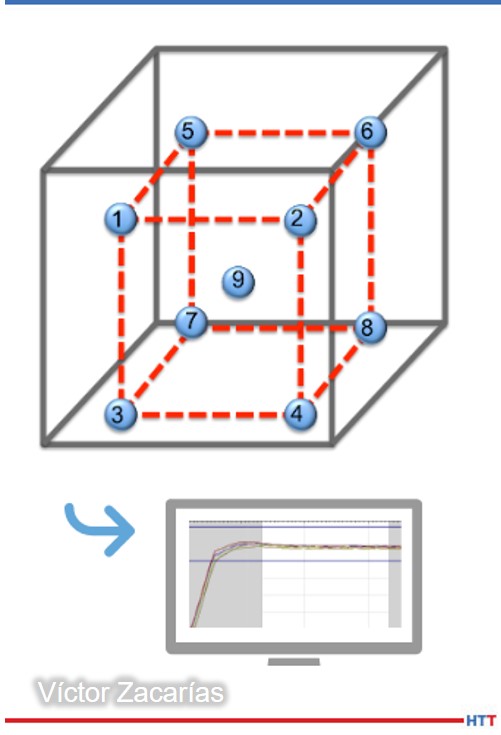
A Temperature Uniformity Survey (TUS) is a test where a calibrated instrument (data logger) and several calibrated thermocouples measure the temperature variation inside the furnace. The result of a TUS test indicates where the hottest and/or coldest spots are in a furnace and provides elements to determine how to correct them.
For most commercially available furnace volumes, TUSs are conducted introducing nine thermocouples for batch type furnaces, and three tracking thermocouples for continuous furnaces.
A TUS is considered acceptable if the test thermocouple readings are within the limits set by the specification for the required time. TUS is highly recommended to be performed after the initial installation of the equipment or after a modification that could alter the heating characteristics of the furnace. Subsequently, they must be carried out periodically in accordance with the applicable regulation.
Importance of Pyrometry
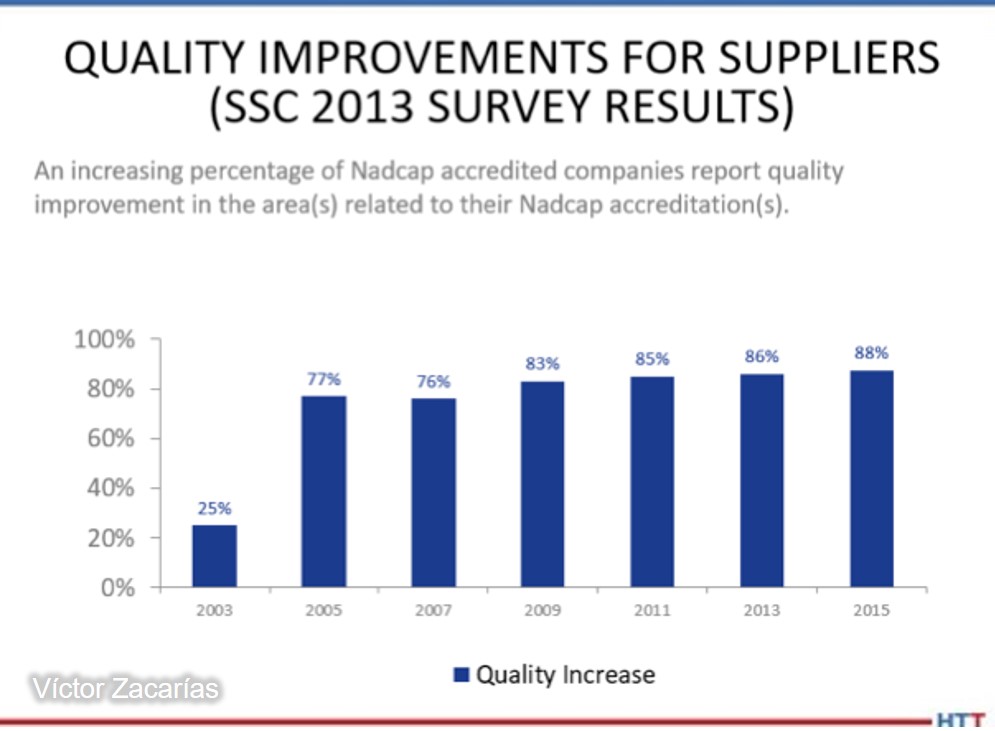
The labor of harmonizing special processes is not easy. However, there is strong evidence that proves the effectiveness of this eff ort. For example, Supplier Technical Assistance teams at Ford Motor Co. have followed the results achieved by the implementation of CQI-9 by their suppliers and have estimated cost savings of up to 20 million dollars in reduction of heat treatment defects. Similarly, the Performance Review Institute, which is the organization in charge of managing Nadcap, reports increasingly positive results each year by the implementation of the program, impacting directly on continuous improvement of aerospace organizations that accredit it (Figure 4).
Pyrometry testing provides valuable information that encourages preventive maintenance of furnaces and related equipment. At the same time, it provides understanding of the measurement systems that allow achieving repeatable metallurgical results. In both cases, the information generated in pyrometry allows heat treaters to reduce scrap and quality claims and most importantly, ensures business continuity by showing compliance with customers’ requirements.
About the author: Víctor Zacarías is a metallurgical engineer from the University of Querétaro with studies in Strategic Management from Tec de Monterrey. With over 15 years of experience in heat treatment management, he is currently the managing director of Global Thermal Solutions México. Victor has conducted numerous courses, workshops, and assessments in México, United States, Brazil, Argentina, and Costa Rica and has been a member of the AIAG Heat Treat Work Group (CQI-9 committee).
Contact Víctor: victor@globalthermalsolutions.com
 Find heat treating products and services when you search on Heat Treat Buyers Guide.com


