This is the fifth in a series of articles by AMS2750 expert, Jason Schulze (Conrad Kacsik). Click here to see a listing of all of Jason’s articles on Heat Treat Today. In this article, Jason advances the discussion of TUSs with a lesson on the definitions of key AMS2750E terms. Please submit your AMS2750 questions for Jason to editor@heattreattoday.com.
Introduction
When executing a technical process, understanding the meaning and intent of certain definitions can clarify the interpretation of certain requirements, thereby, altering a specific course based on that interpretation.
In this article, we will focus on the primary definitions associated with temperature uniformity surveys as they apply to AMS2750E.
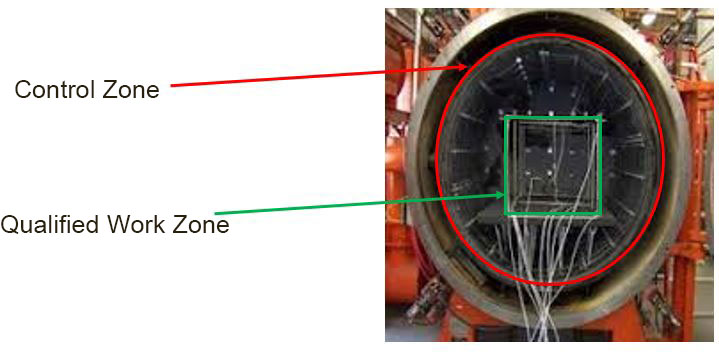
Control Zone vs Qualified Work Zone
Control Zone
AMS2750E, page 44, para 2.2.9: “A portion of the work zone in thermal processing equipment having a separate sensor/instrument/heat input or output mechanism to control its temperature. This portion of a furnace is independently controlled.”
Qualified Work Zone
AMS2750E, page 6, para 2.2.42: “The defined portion of a furnace volume where temperature variation conforms to the required uniformity tolerance.”
It’s important to understand the difference between the two definitions. Below is a figure which outlines the most basic idea behind each.

Failure of a Survey Thermocouple
AMS2750E, page 4, para 2.2.19: “Obviously incorrect or erratic activity of a survey thermocouple indicated by extreme high readings, extreme low readings, and/or erratic changes in readings not reflected by other sensors.”
This situation can be observed by pyrometry technicians in real time as the survey is running. Possible reasons for this may be:
- a loss in chrome due to vapor pressure (vacuum furnaces only),
- movement of the thermocouple during the test from the documented position,
- Polarity reversal during test thermocouple assembly.
Note that AMS2750E allows only a specific number of thermocouples to fail during a TUS (see AMS2750E, page 30, para 3.5.16).
Heat Sink
AMS2750E, page 5, para 2.2.24: “A mass of material equivalent to the heat transfer characteristics of the thinnest section of the part being heat-treated. Heat sinks may be used during TUS (3.5.10.1) and during production (3.3.5).”
The use of heat sinks during a TUS is optional. Operators are permitted to utilize heat sinks on both TUS test thermocouples and the load thermocouple being used. The key is to document the initial TUS load condition, including the use of heat sinks, and utilize this configuration on subsequent tests.
If heat sinks are utilized on either the TUS test thermocouples, or the load thermocouples, the heat sink must comply with AMS2750E, page 26, para 3.5.10. Additional requirements and clarification regarding heat sink requirements can be found in the Nadcap Pyrometry Guide on page 47, question #43 and Heat Treat Auditor Advisory 17-007.

Qualified Operating Temperature Range
AMS2750E, page 6, para 2.2.41: “The temperature range of thermal processing equipment where temperature uniformity has been tested and found to be within required tolerances as specified in 3.3”
This temperature range affects multiple aspects of pyrometry, including the instrument calibration setpoints of both furnace instruments (AMS2750E page 14, para 3.2.5.5.1) as well as field test instruments (AMS2750E, page 14, para 3.2.5.4) used on that particular equipment. It also affects what product can be heat treated in the particular furnace.
Field Test Instrument
AMS2750E, page 4, para 2.2.20: “An instrument that is portable, that meets the requirements of Table 3, has calibration traceable to secondary equipment or better and is used to conduct on-site tests of thermal processing equipment.”
One of the key points in this definition is the term “portable”. This implies that furnace instruments cannot be used as field test instruments. For those new to pyrometry, this may cause confusion as a single instrument make and model could be designated as a field test instrument or a furnace instrument. As an example, consider a Yokogawa DX model electronic recorder. A supplier could buy two of the same model and use one as a furnace recorder and the other as a TUS recorder (making it a field test instrument). The only differences are its designated use, calibration points, and the fact that is independent from the furnace (portable).
Field test instruments must be calibrated using a standard instrument or better at 6 points per AMS2750E, page 14, para 3.2.5 and have an accuracy of ±1°F or 0.1%, whichever is greater.
Temperature Uniformity
AMS2750E, page 7, para 2.2.66: “The temperature variation (usually expressed as ± degrees) within the qualified furnace work zone with respect to set point temperature. For retort furnaces where a sensor in the retort is used to control temperature, the temperature variation is with respect to the sensor in the retort and not to the furnace set temperature.”
This relates directly to the furnace class designation per Figure 2 of AMS2750E. It’s important to keep in mind question #21 of the Hwhen designating furnace class.
Temperature Uniformity Survey
AMS2750E, page 7, para 2.2.68: “A test or series of tests where calibrated field test instrumentation and sensors are used to measure temperature variation within the qualified furnace work zone prior to and after thermal stabilization.”
As any pyrometry technician knows, one of the main issues to watch for is thermal inertia, or overshoot. Any overshoot will be cause for immediate failure and initiation of an internal RCCA per AMS2750E, page 34, para 4.2.
Conclusion
Understanding AMS2750E definitions will be advantageous to readers of the remaining articles in this TUS series.
We will next discuss the differences between periodic surveys, initials surveys and more.
Submit Your Questions
Please feel free to submit your questions and I will answer appropriately in future articles. Send your questions to editor@heattreattoday.com.


