![]() Want a free tip? Check out this read of some of the top 101 Heat Treat Tips that heat treating professionals submitted over the last THREE YEARS. These handy technical words of wisdom will keep your furnaces in optimum operation and keep you in compliance. If you want more, search for "101 heat treat tips" on the website! This selection features 10 tips to meet heat treat industry standards.
Want a free tip? Check out this read of some of the top 101 Heat Treat Tips that heat treating professionals submitted over the last THREE YEARS. These handy technical words of wisdom will keep your furnaces in optimum operation and keep you in compliance. If you want more, search for "101 heat treat tips" on the website! This selection features 10 tips to meet heat treat industry standards.
Also, in this year's show issue, Heat Treat Today will be sharing Heat Treat Resources you can use when you're at the plant or on the road. Look for the digital edition of the magazine on September 13, 2021 to check it out yourself!
Compliance Issues? Try On-Site Gas Generation
On-site gas generation may help resolve compliance issues. Growth and success in thermal processing may have resulted in you expanding your inventory of reducing atmosphere gases. If you are storing hydrogen or ammonia for Dissociated Ammonia (DA), both of which are classed by the EPA as Highly Hazardous Materials, expanding gas inventory can create compliance issues. It is now possible to create reducing gas atmospheres on a make-it-as-you-use-it basis, minimizing site inventory of hazardous materials and facilitating growth while ensuring HazMat compliance. Modern hydrogen generators can serve small and large flow rates, can load follow, and can make unlimited hydrogen volumes with virtually zero stored HazMat inventory. Hydrogen is the key reducing constituent in both blended hydrogen-nitrogen and DA atmospheres—hydrogen generation (and optionally, nitrogen generation) can be used to provide exactly the atmosphere required but with zero hazardous material storage and at a predictable, economical cost.
(Nel Hydrogen)
Inspection Mistakes That Cost
Rockwell hardness testing requires adherence to strict procedures for accurate results. Try this exercise to prove the importance of proper test procedures.
- A certified Rc 54.3 +/- 1 test block was tested three times and the average of the readings was Rc 54 utilizing a flat anvil. Water was put on the anvil under the test block and the next three readings averaged Rc 52.1.
- Why is it so important that samples are clean, dry, and properly prepared?
- If your process test samples are actually one point above the high spec limit but you are reading two points lower, you will ship hard parts that your customer can reject.
- If your process test samples are one point above the low spec limit but you are reading two points lower, you may reprocess parts that are actually within specification.
- It is imperative that your personnel are trained in proper sample preparation and hardness testing procedures to maximize your quality results and minimize reprocessing.
(Young Metallurgical Consulting)
Where You Measure Matters
Eugene Gifford Grace (August 27, 1876 – July 7, 1960) was the president of Bethlehem Steel Corporation from 1916 to 1945. He also served as president of the American Iron and Steel Institute and sat on the board of trustees for Lehigh University, of which he was an alumnus. One of his famous quotes is as follows:
“Thousands of engineers can design bridges, calculate strains and stresses, and draw up specifications for machines, but the great engineer is the man who can tell whether the bridge or the machine should be built at all, where it should be built, and when.”
If you check out the additional accomplishments of Mr. Grace, you will see that he was a successful and smart person. Maybe all of us are not capable of reaching such breadth of vision as he articulated above, but as heat treaters, do we simply accept the specification given? Or do we stop to ask if the specification has been properly determined?
With modern computer added stress analysis (FEA), we have at our fingertips a way to move beyond both the “guess and test” and the “copy the historical spec” methods of determining the case depth. Within “guess and test,” of course there are scientific guesses and scientific wild guesses. If you are using a wild guess, chances are that the field is the test lab!
Especially for carburized components, deeper case is more time in the furnace, and thus more expensive. I continue to wonder why, if even back in the 1950s, thousands of engineers were available who could calculate stresses and strains and thus set a quantitative foundation for a case depth, in 2019, so few people take advantage of modern technology to optimize the cost of their products.
If you are not ready to take this big step toward design optimization, maybe you would consider always using effective case depth, based on hardness and thus linked to tensile strength, instead of total case depth, which is not linked to any durability or strength criteria.
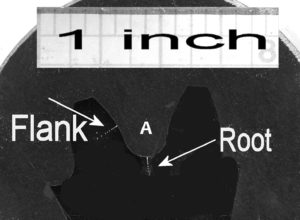
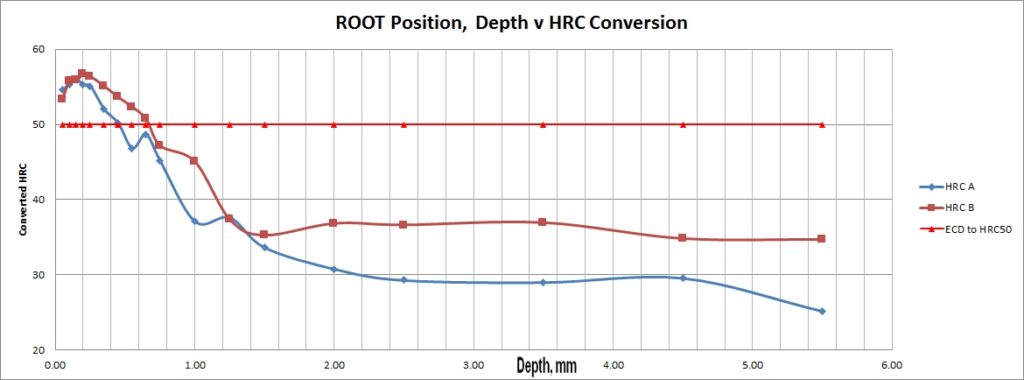
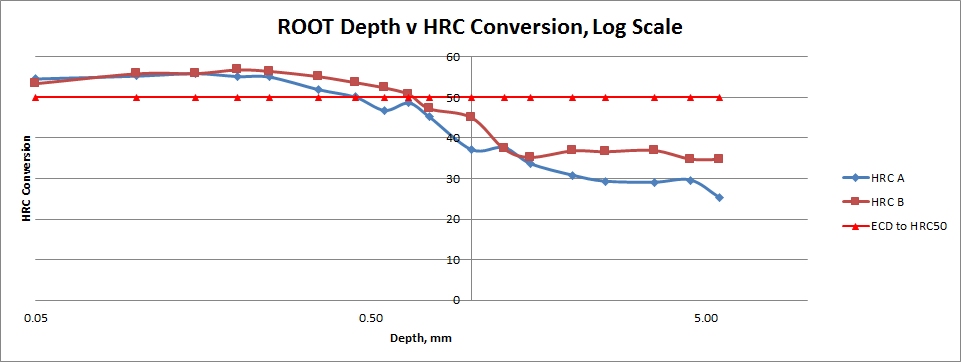
Figure 1 shows the metallographic cross-section that was used to measure the hardness. Each white pin point is a Knoop 500 gram hardness indentation. The cross-section of the gear was mounted in black epoxy resin. Figures 2 to 4 show the data collected to determine the effective case depths to the common Rockwell C 50 criteria.
The effective case depth is the depth where the hardness dips below HRC50. For Gear Tooth Flank A, that value was 0.85 mm. For another gear from the same lot, it was over 1.08 mm. But for the root areas, between the teeth—the high-stress area, the effective case depths were only 0.45 and 0.65 mm, respectively. Figure 3 shows the same data as Figure 2, but using a logarithmic scale, illustrating what’s going on near the surface layers more clearly.
In any case, there’s a big difference between the two test locations, and this shows the importance of making sure that all relevant features of the component are adequately characterized!
(Aliya Analytical, Inc.)
AMS2750 Is Golden
This standard is gold and unfortunately has a bad rap today because companies feel it’s just added cost into the process. Today’s technology means you can afford AMS2750E compliant controllers and digital recorders for only a few hundred dollars above a standard offer. This investment will be paid back many times over due to the longer lifetime expected with a quality instrument as well as the quality benefits from better drift performance between calibration intervals, redundant recording (in case of record loss), and overall accurate temperature control, leading to less rejects and reduced rework.
(Eurotherm)
Snagged T/C Wire – Avoid It
Try not to use insulated thermocouple wire if you snag the insulation off the outerjacket along the length of the wire. This may cause the inner insulation to fail andcause low temperature readings.
(WS Thermal)
Order SAT Probes All at Once
Place a yearly blanket order for your SAT probes and ask that they are made from the same coil. This will give you the same correction factors and temperature tolerances.
(GeoCorp)
 Out of Control Carburizing? Try This 11-Step Test
When your carburizing atmosphere cannot be controlled, perform this test:
- Empty the furnace of all work.
- Heat to 1700°F (926°C).
- Allow endo gas to continue.
- Disable the CP setpoint control loop.
- Set generator DP to +35°F (1.7°C).
- Run a shim test.
- The CP should settle out near 0.4% CP.
- If CP settles out substantially lower and the CO2 and DP higher, there’s an oxidation leak, either air, water or CO2 from a leaking radiant tube.
- If the leak is small the CP loop will compensate, resulting in more enriching gas usage than normal.
- Sometimes but not always a leaking radiant tube can be found by isolating each tube.
- To try and find a leaking radiant tube, not only the gas must be shut off but combustion air as well.
(AFC-Holcroft)
3 Tips to Meet Temperature Uniformity Surveys
- Adjust the burners with some excess air to improve convection.
- Make sure that the low fire adjustment is as small as possible. Since low fire will provide very little energy, it will make the furnace pulse more frequently and this will improve heat transfer by convection and radiation.
- Increase internal pressure. This will “push” heat to dead zones allowing you to increase your coldest thermocouples (typically near the floor and in the corners of the furnace).
(Nutec Bickley)
CQI-9 Best Practices
Whether you need to meet rigid CQI-9 standards or not, what are the top 3, nay 4 best practices that nearly every in-house heat treat department ought to follow to make sure their pyrometer stuff is together?
Daily furnace atmosphere checks. Use an alternative method to verify your controls and sensors are operating properly and that there are no issue with your furnace or furnace gases.
Daily endothermic generator checks. Using an alternate method to verify your control parameter (dew point typically) or the gas composition is accurate will alleviate furnace control issues caused by bad endothermic gas.
Verify/validate your heat treat process every 2 hours OR make sure process deviations are automatically alarmed. this is a solid practice to ensure your controls and processes are running properly. This practice can help ensure that parts are being heat treated to the proper specification intended.
Conduct periodic system accuracy tests (SATs) per pre-defined timelines in CQI-9. Good pyrometry practices are an essential part of heat treatment. Because of the importance of temperature in heat treatment, ensure timeliness of all pyrometry practices addressing thermocouple usages, system accuracy tests, calibrations, and temperature uniformity surveys.
(Super Systems, Inc.)
Inspection Mistakes That Cost
Rockwell hardness testing requires adherence to strict procedures for accurate results. Try this exercise to prove the importance of proper test procedures.
- A certified Rc 54.3 +/- 1 test block was tested three times and the average of the readings was Rc 54 utilizing a flat anvil. Water was put on the anvil under the test block and the next three readings averaged Rc 52.1.
- Why is it so important that samples are clean, dry, and properly prepared?
- If your process test samples are actually one point above the high spec limit but you are reading two points lower, you will ship hard parts that your customer can reject.
- If your process test samples are one point above the low spec limit but you are reading two points lower, you may reprocess parts that are actually within specification.
- It is imperative that your personnel are trained in proper sample preparation and hardness testing procedures to maximize your quality results and minimize reprocessing.
(Young Metallurgical Consulting)
Check out these magazines to see where these tips were first featured:



 Out of Control Carburizing? Try This 11-Step Test